Working on the floor and my patience

Saturday morning was spent rounding up supplies and materials to start laying down the floor in the bus. We made a trip to Lowe's and bought the moisture barrier, insulation boards, and plywood along with some screws and a few other odds 'n ends.

Saturday afternoon/Sunday morning we put down the floor frame for the shower stall and then got to work on the floor. First, we filled in all the little holes with some caulk. Then we put down the moisture barrier (6 mil plastic sheets) starting in the back of the bus. We then put down the RMax insulation boards. Finally, we topped it all with the plywood and screwed it all down.

It took much longer to do this than I thought. After several hours of work, we only have about half of the floor completed. Of course, we did the hardest part of the bus first. We did the very back and then around the toilet closet and shower stall - which required quite a bit of measuring and cutting and fitting and caulking. Since the hard part is done, the rest should be pretty easy. The hardest part will be moving all the tools and accumulating supplies from the bus and sorting through it all to figure out what needs to go back in the bus. After that, we just have to take the full sheets and lay them down. Not much left to measure and cut at all.

We have plans to be out of town (going to Atlanta) this upcoming weekend and won't be getting anything done on the bus at all. We wanted to be able to get the floor finished at some point throughout this week, but the weather seems to have other plans. (Lots of tropical storms/hurricanes out there sending bad weather our way.) If things don't change, we won't get the floor done for another two weeks.

In the meantime, Jim and I both continue to research and talk and come up with new ideas or improvements on old ideas. So while it may seem that we are at a standstill, we are always moving forward in one way or another. But quite honestly, there is that big part of me that thinks it is not fast enough.

Patience. I keep telling myself, "PATIENCE"!

Vlog: Taking a break!


Shopping, Caulking, and Building

SATURDAY

The weekends are when the big(gest) gains are made and this past weekend was no different. We spent all day Saturday shopping in Chattanooga. We decided to hit a couple of different salvage/discount places to see what they had to offer. We really didn't have any one particular thing in mind, but we were hoping to find some decently priced flooring at some point.

The drive to Chattanooga was beautiful. The weather was perfect, the sun was shining, there were huge fluffy clouds in the bluest sky you've ever seen.


Somewhere throughout the day, a huge thunderstorm with matching clouds moved through and the drive back wasn't quite as spectacular. Or at least not in the same way.


Our first stop was at the Chattanooga Habitat for Humanity ReStore. This is really an awesome place to find reusable items and even extremely discounted surplus items for building a home (or a converted bus). We ended up looking around and realizing that they had quite a few items of interest once we reach certain other stages in the bus development, so we will definitely be returning at a later date to check them out. We did walk away from them on Saturday with about $46 worth of stuff. We ended up with the following items:

  • ~100ft of copper wire for $2.00 (Jim needs this to run his welder and said that this was a killer deal. It would have cost us well over $150 or so to buy it direct from a seller.)
  • 2 fire extinguishers for $40.00/total (They are the heavy duty ones that normally go for about $100 a piece.)
  • roof top bike rack for $2.00 (We hope to make this work for either my vehicle or Jim's truck. If not, it will be easy to take the metal alone and use it for the bus at some point.)


Next, we stopped at Southeastern Salvage where we made the biggest and most significant purchase of the day: bamboo flooring. I was super excited to find this and the price was really hard to beat: $1.29 per square foot. If we've been lucky enough to find any sort of bamboo flooring around here at all, it's been outrageous on the price front. So we swooped in and took advantage of this deal. I feel much better knowing the flooring is coming from a renewable resource since we are trying to be very conscious about such things in the building of Resurrection Fern.

Check it out:


We also stopped at Harbor Freight so Jim could walk around and touch everything and daydream about owning one of everything and then eventually decide that we really can't afford such a daydream so we pay for the handful of items he needed (don't ask me. I don't know.) and left.

I won't tell you about the amazing root beer float I had at Steak 'N Shake. Just thinking about it makes my mouth water. *Yum*


SUNDAY

As is the case with projects such as this, things change. After much discussion, Jim and I decided to go with our original plan of separating the toilet closet and the shower stall. Remember the previous entry? Yeah. Umm. Scratch that!

So the new plan is to use less space in our master sleeping quarters (this means that we will downsize from a king to a queen) in the back to give us a little more room to put the toilet closet on the backside of the passenger's side wheel well and the shower stall on the backside of the driver's side wheel well. This will actually give us more leg/storage space in the toilet closet and more elbow room in the shower stall. It's a win/win situation.

The main reason for making this change was Jim coming up with a killer way to install a complete composting toilet system that will work on a bus without costing a fortune. It will include a large holding tank, much like a black water tank but without all the ewwwwww! that goes with it, that will eventually be mounted underneath the bus. In order to make it work, we needed to move the toilet to the other side of the wheel well. This didn't quite jive with our previous idea so we just decided to separate the shower and toilet to make it work.

That being said, we set out to put up the initial frame for the toilet closet on Sunday since this is one of the first things we want to accomplish with the rebuild. Before we could do that, however, we really needed to take care of the four windows that are going to be involved in the toilet/shower area. The caulk around the window frames was all dried up and cracking. So we decided to clean it out and put some fresh caulk in before doing anything else.


Before cleaning out the mess
This is what the dried up caulk looked like surrounding the entire window before we cleaned it out.

After cleaning out the mess
This is what it looked like with all the old caulk removed.

Jim applying fresh caulk to the windows
Jim then applied a fresh layer of caulk around all the windows.


Once that was done, we went to work on building the frame for the toilet closet. Jim didn't want to use 2x4s for the wall frame because they are so heavy and just take up unnecessary space. And instead of purchasing the smaller pieces of wood at Home Depot, we simply bought the 2x4s and cut them in half. We ended up saving quite a bit of money doing it this way. Of course, this meant that we had to drag out the saw and get noisy and dirty with it. But that's half the fun, right?

Getting ready to get noisy
Jim is getting ready to measure and cut.

The first boards of our first structure inside the bus
The first boards are put down and are the beginning of the first official structure inside the bus.

The toilet closet frame is taking shape
The toilet closet frame is taking shape right before our eyes. I can almost see it now.

Finished for now
By the end of the day, this is what we had.


We still have to build a platform that will fill in the space right at the back of the wheel well, but for the most part the frame for the toilet closet is done!

Next on the agenda is to get the frame for the shower stall done and add the walls. And then there is the looming task of finishing up that caulking thing for ALL the windows on the bus. That should be LOTS of fun.

A Bathroom for the Spatially Challenged

I'm a very visual person. I know that some people can lay out entire floor plans for multi-level buildings in their heads and know the exact dimensions of every room, where every wall will go, and how the end result will look.

For the record, I am NOT one of those people. I can't envision what something will look like. I can't imagine what the final result will be. I need to actually see it plotted out in black and white. Or in living color, if that works.

So how does one's husband (notably: MINE) go about explaining the thought process behind installing a bathroom on a bus to someone who is spatially challenged (notably: ME)?

They create a makeshift bathroom using chalk lines, bamboo poles, and paper. Of course.


I was having trouble figuring out exactly how much floor space that was going to be required to build the bathroom and the exact location that Jim had in mind for it. So he used bamboo poles and the paper we had covering the windows when we painted the ceiling to build walls and create the exact way that the bathroom enclosure will look.


I also couldn't quite wrap my mind around the exact positioning of the compost toilet and how it was going to work, mostly because it will be placed on top of the wheel well. I just couldn't understand how there would be enough room for us to sit, do business and clean up afterwards in that small of an area. The toilet (bucket) will be built into a squared off platform that fits over the wheel well.


He was even kind enough to demonstrate that there will be plenty of room to take care of all the business we need to take care of in there. Sure, it's not like we are going to be hanging out reading the Sunday paper in there, but who really does that anyway?


Then there was the issue of a place to shower. We intend on having a solar shower system in place and honestly didn't expect to have much room at all, but I couldn't quite figure out if there would be enough room to move around, wash hair, shave legs, etc. Truth is, we did have to adjust the length from our original plan. Otherwise, there would not have been enough room at all.


Jim wants to get the bathroom done as soon as possible so we can start going places in the bus sooner rather than later. That means we have to be sure about the placement and size of the area, especially with the plumbing and tank placement being somewhat permanent - ya know? So now I feel better about the whole thing. I now have a good understanding of how it's going to be built and what it will look like. That will make the next step much easier, which is trying to figure out what to line the shower stall with and how to set up the compost toilet and where to run the plumbing and set up the tanks.

Oh, what fun!

Making our Mark: the Ceiling

We spent the better part of yesterday on the bus, finally making our first mark and claiming it as ours. Up until now it's been all about the deconstruction: removing the seats, pulling up the floor, taking down signs, etc. But we finally spent some time working on the first "project" that would allow us to officially say that she is ours: we painted the ceiling.


This is what we started out with - the factory painted "kind of funky green color" ceiling. While it may not look like it in the photo, we had spent several hours with scratch pads to remove a lot of the glossiness so the new paint would stick to it.


We really wanted to use a low VOC paint since it is going to be inside where we will be spending a lot of time in close quarters. Jim did some research and found out that Sherwin Williams carries several kinds of low/no VOC paints. We decided to go with the SuperPaint, flat white. I was concerned about the price, considering the fact that low VOC paints are usually quite pricey. This is where knowing people comes in handy. I just so happen to know the asst. manager at Sherwin Williams and she gave us the "contractor" discount, making a gallon of paint that normally runs about $30/gallon come out to a cool $17/gallon. Score!


We ordered some ThermaCels for insulation and they arrived via FedEx in just a few days. Some people refer to them as "ceramic beads". I was quite shocked to see that it really just resembles powder and not at all ceramic like or bead like. We ordered enough to do 5 gallons of paint, hoping that it will be enough to do both the inside and outside.


Jim took one of our 5 gallon buckets - intended for a composting toilet in the future - and mixed the ThermaCels and paint together.


Here it is, all mixed up and ready to go.


It was definitely a group effort to get the two coats painted on to the ceiling. Once mixed together, the paint and ThermaCels form a liquid that has the consistency of sand or grit.


Two coats later, this is what our newly insulated ceiling looked like.


Once everything was dry, Jim started on our sky ceiling. The idea is to have a fading day sky (in the front) to night sky (in the back). We bought 4 quarts of various shades of blue paint - low VOC of course - to combine and create the transition that we are looking to achieve. Once the sprayer was hooked up to the air compressor, we were in business. We started in the back since that is where we started with the insulation coats and it was the driest.


Instead of just switching colors, we mixed them so they blended together more seamlessly. Check out that homemade funnel action we had going on.


Here I am, hanging out at the picnic table while Jim takes a turn at spray painting the ceiling. Since we only had one respirator between us, the one not working had to take a break outside while the other worked. It was a nice way to break up the day.


This is the view I had from the picnic table.


Here is the end result of day one on the sky ceiling. This is the view from the middle of the bus looking to the back. A moon will eventually go on that back panel and some (glow in the dark?) stars will be added, as well.


This is the view from the middle of the bus looking to the front. A sun will eventually go somewhere on the front/top with rays shooting across.


This was all we had time to complete before we ran out of daylight and realized the lamps we had hooked up weren't going to be enough to finish completely. As I said, we still have to add a sun and a moon and some stars. Some of the areas need a little touching up to make them look like we want them to. And we have yet to really use the lightest color of blue on the front to finish it off. So we still have a little work to go on the ceiling, but it really has turned out like I envisioned it. We are all super excited with it and can't wait to finish it up and take our next step to further claiming Resurrection Fern as our own.


Check out the video:


* * * * *


Edited to add:

We had a really hot day yesterday. The sun spent an entire day beating down on the top of the bus while Jim and I were at work. In the late afternoon, we both went out to check the ceiling temps - just to see if the ThermaCels were doing their job. I'm happy to report that we could actually touch the ceiling and even hold our hands in place over the metal ribs without developing severe burns. Which, by the way, was impossible prior to putting the two coats of ThermaCels on. So, while it's not a scientific and definitive conclusion, it is our opinion that the ThermaCels are working and doing exactly what they are supposed to be doing.

A little something every day

Jim and I are both working a 40 hour work week. Two days a week we both get home at the same time. The other three days I am home around 1:30 - 2:00 in the afternoon and he follows around 4:30pm. We both have the weekends off. I think it's important to point this out early on, as it becomes hard to make a lot of progress throughout the week. Hopefully we can continue to work as much as possible on the weekends and feel like we are making a dent in things. Right now we have managed to get at least a little something done every day, even if it's going to Home Depot to pick up some "goo" remover to take off the sticky mess left behind by all those tacky school bus stickers - which is what we did yesterday.

Since my last post, we have managed a few little things. Here's the short list:


We went ahead and pulled up the rubber flooring on the steps. We were pleasantly surprised to find that it all looks good, with the small exception of a tiny rusted through hole in the very right hand corner of the lower step (not visible in this photo). It's easily fixed, though, so no worries.


* * *


Jim spent a whole day last weekend with the grinder and the bus floor, steadily working away at the larger rust areas that were a bit pitted and deeper than just a mere surface rust. Jim then applied some rust inhibitor with a roller, which did an excellent job once it set overnight and was pressure washed out. I was amazed at the amount of rust that was just ---- GONE!

* * *


Once it was completely dry (another 24 hours), Jim rolled it with some primer. We actually had two different brands and the color varied just slightly. So when looking at the floor afterwards, it appeared to still be wet in areas due to the color variance. Seeing as how this will soon be covered with a subfloor, it is of no concern. Naturally.

* * *


I didn't take photos, but we also removed all the stickers on the inside of the bus and scuffed up the paint on the ceiling in preparation for painting. It took both me and Jim (with a little help from the kids) a couple of really hard scrubbing hours to complete. My shoulders and hands are still sore/aching.

In the next couple of days we plan to cover/tape up the windows on the inside and put a layer of primer on the ceiling. (The plans have changed for this, of course, and I'll discuss it once we get to it.) The ceramic additive we ordered should be delivered today or tomorrow, allowing us to possibly get the ceiling painted by this weekend.

That's where we are and where the next phase is headed. There's a little movement each day and with each day we get closer and closer to having her ready to hit the road.

Stay tuned ...

The Making of Resurrection Fern, part 1

Subject to Change

When converting a school bus, it's smart to adopt the following motto and do it as soon as possible:

All Plans Are Subject To Change. And change again. And again. And ...


Our floor plan has changed at least three times in the last week. Our color scheme for the outside of the bus has changed at least three times in the last two weeks. We keep going back and forth about the best method for a toilet (with water or without). One day we are building storage underneath for potable water, the next day we are building a platform bed in the back and sticking the tanks underneath. Do we separate the toilet and shower or put them together?

You see what I mean.

Just call me Bendy because I am just all kinds of flexible right now.

It's all very exciting and it is so easy to jump in head first and want to attack every little thing in order to get it done ASAP. The whole purpose is to get on the road and, especially when it's been an ongoing dream and obsession for over 2 years, it's hard to pull back and breathe. And think. And consider all angles. And be practical and smart about things. It's in the backyard, for crying out loud! FINALLY! That's why it's good to have a level headed member of the family to pull you in and remind you of the reality the situation holds. Granted, some days you are the crazy one and some days you are the level headed one. And I honestly don't believe one is always better than the other. I just believe they are both necessary.

So. Discussions continue to be held. Ideas continue to be shared. Dreams continue to be had. And plans continue to change. It's all good. Really.

One idea that is taking shape and I really hope doesn't change is what we intend to do with the inside "ceiling" of the bus. Once a conclusion is reached about the final insulation method, it needs to be painted. I, being the dreamy nature, Earth girl that I am - decided that I want the ceiling to be a sky. With clouds. Kind of like this:

photo taken in my backyard last weekend


I found a great video demonstrating almost exactly how I want it to look. Jim has given me the ok to do it this way and even suggested I do a practice run on an old piece of wood or something first to get the hang of it.

Even with this, the motto applies. Soon after agreeing we would paint a sky with clouds on the ceiling, Jim comes up with the idea to have the sky transform from a day sky to a night sky as it moves from the front to the back of the bus. He just so happened to have this idea at the exact same time that I was thinking about it. (We do that a lot.) So we are going to go for it and have a fading sky for a ceiling.

Then again, it's all subject to change.

Stay tuned to see how it all works out. If nothing else, it should be interesting.

She's been gutted and washed!

"We've gotten a lot done in a week, haven't we?", I stated casually to my husband after a productive day of work on the bus this afternoon.

"Well, we've gotten some visible stuff done this week.", he replied.

I've never built a house before but I've talked to a lot of people who have. I recall them being amazed at how quickly the framing, the roof, the walls, the floor, etc. all go up once work is started. But then the smaller things - the things that you don't see immediately - take longer and seem to take forever to complete. I'm assuming this is how it will be with the bus. Because we are building a house, right?

The visible stuff my wonderful husband was talking about is mostly the gutting of our beloved new future home on wheels. Fernie - my nickname for Resurrection Fern - no longer has her insides. Everything has been removed. And today we even took a couple of hours and pressure washed her a bit.

Speaking of which, we scored an awesome Troy Bilt pressure washer from my brother-in-law for the low, low price of $150. It's practically brand new and works like a charm. We considered renting or borrowing but decided we couldn't pass up the opportunity or this deal. So now we own a pressure washer and can use it anytime we need it. Which, I'm guessing will be quite often over the next few months.

Without further ado, here we have the progress so far.


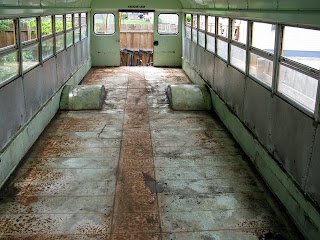
This is what Fernie looked like in the beginning. She was a typical school bus full of bus seats to carry little ones back and forth to school.


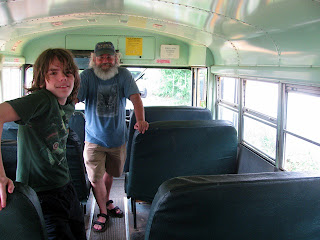
Jim and Colin are proud to show off the removal of the first seat.


We picked one side and removed all the seats and backs in order to get them ready for removal.


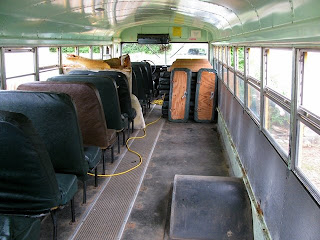
One side is seat free.


All the crap that we swept up after removing the other side of seats. We put the loose change in a plastic cup. I think we probably scored a buck or two at least.


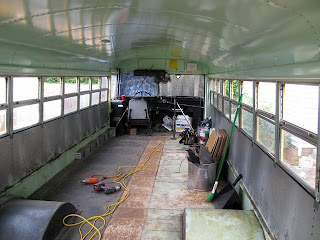
All the seats are gone and the middle strip on the floor has been pulled up.


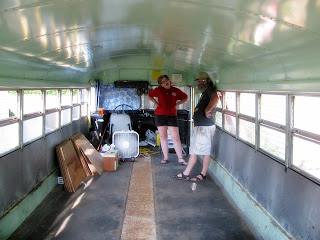
Lauren and Jim stand for a moment and enjoy the site of our new shell of a home.


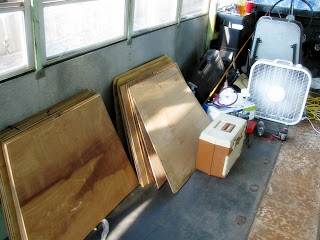
We are saving the plywood backs of the seats in case we can reuse them when building the cabinets, shelves, etc.


Early Saturday morning we made our first dump run to rid ourselves of the seat cushions.


The next step was to remove the rubber floor, which required Jim to bring out the angle grinder quite a few times.


One side of the floor has been successfully removed and it was time to for Jim to go pick up the pressure washer. The plan was for me to just straighten up the bus and we would do the other side on Sunday.


Like any good and obedient wife, I didn't listen. While he was gone (about 2 hours), I pulled up the other side. All that remained was the wheel well and what was underneath the heater and vents.


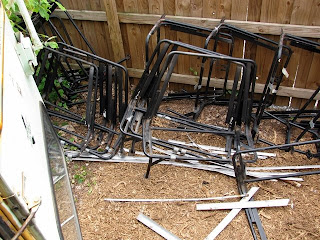
We are keeping the seat frames because we plan to reuse them to build storage frames for tanks/storage/etc.


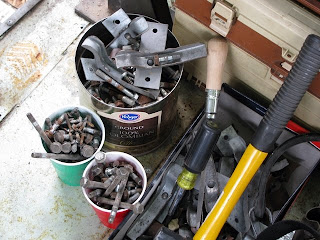
We also kept all the hardware from removing the seats and floor because you can never have too many nuts, screws, and bolts.


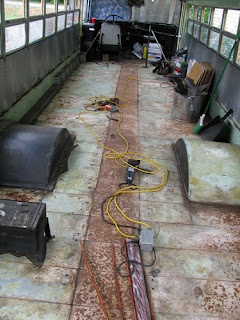
It's all gone now. The seats are gone. The floor is gone. The heater and vent housing is gone.


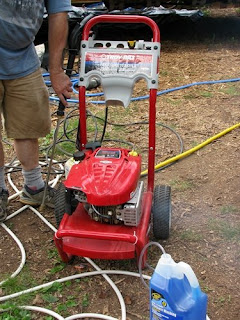
Jim powers up the pressure washer for the first trial run.


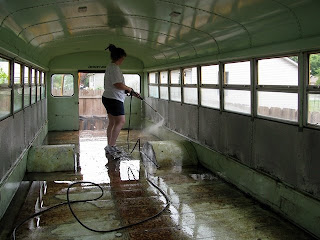
After making sure it worked as needed, Jim let me play around with it for a little while.


Then Lauren got in on the action.


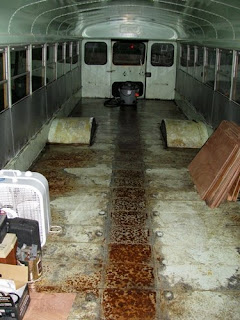
A thunderstorm crept up on us and we had to call it quits for the day. But this is what Fernie looks like right now with all her guts removed and her first inside bath.


Notes:
* Seat removal wasn't as difficult as we imagined but it did require a good bit of angle grinder use (a lot of screws were stripped and/or crusted over with goopy, sticky stuff and just wouldn't budge at all) and two people (one on top and the other underneath the bus). Total time to remove seats: Approximately 8 hours.

* Rubber floor removal was a little more difficult than the seats. We had to use the angle grinder quite a bit more to get all the screws removed and it took a lot more physical exertion to pull it up and get it out of the bus. Total time to remove floor: Approximately 8-10 hours.

* I am ever so grateful that there was no sub-flooring, just metal, under the rubber. There is a bit of surface rust but otherwise solid. We made sure to check both the top and crawled underneath to check the floor from the bottom.

* Our pressure washer has already paid for itself after the first use. I don't even want to imagine all the elbow grease it would have taken to remove all the sticky, gooey mess left behind from years of children sticking gum in every nook and cranny.


So there you have it - one week down and many, many more to go. Let the adventure continue.